<!DOCTYPE html> <html xmlns="http://www.w3.org/1999/xhtml"><head> <!--[ GuppY v5.0.9 CeCILL Copyright (C) 2004-2014 by Laurent Duveau - http://www.freeguppy.org/ ]--> <meta http-equiv="content-type" content="text/html; charset=UTF-8"> <meta name="application-name" content="Casyopée - Attacher une image à un point"> <title>Casyopée - Attacher une image à un point</title> <meta name="description" content="Casyopée: a learning environment dedicated to functions"> <meta name="generator" content="GuppY CMS"> <meta name="author" content="lagrange"> <meta name="keywords" content="casyopée, functions, mathematics, geodynamic geometry, cas, symbolic computation,"> <meta name="viewport" content="width=device-width, initial-scale=1, maximum-scale=1"> <meta name="apple-mobile-web-app-capable" content="yes"> <meta name="apple-mobile-web-app-status-bar-style" content="black"> <link rel="shortcut icon" href="https://casyopee.math.univ-paris-diderot.fr/guppy.ico"> <link rel="alternate" type="application/rss+xml" title="Casyopée : Actualité" hreflang="fr" href="https://casyopee.math.univ-paris-diderot.fr/data/fr-news.xml"> <link type="text/css" rel="stylesheet" href="skins/casyop/style.css"> <link type="text/css" rel="stylesheet" href="skins/casyop/jqstyle.css"> <style type="text/css" media="screen"> @import url(inc/auto.css); </style> <style type="text/css" media="print"> @import url(inc/print.css); </style> <link type="text/css" rel="stylesheet" href="inc/csshead/fotorama.css"> <link type="text/css" rel="stylesheet" href="inc/csshead/menubox.css"> <link type="text/css" rel="stylesheet" href="inc/csshead/slidesjs.css"> <script type="text/javascript"> //<![CDATA[ <!-- var charset = "UTF-8"; var site0 = "Casyopée"; var site3 = "https://casyopee.math.univ-paris-diderot.fr/"; var sValue = screen.width + "||" + screen.height + "||" + screen.availWidth + "||" + screen.availHeight; var today = new Date(), expires = new Date(); expires.setTime(today.getTime() + (365*24*60*60*1000)); document.cookie = "GuppYScreen" + "=" + encodeURIComponent(sValue) + ";expires=" + expires.toGMTString(); //--> //]]> </script> <script type="text/javascript" src="inc/hpage.js"></script> <script type="text/javascript" src="inc/jquery-min.js"></script> <script type="text/javascript" src="inc/jquery-migrate-min.js"></script> <script type="text/javascript" src="inc/jqscript.js"></script> <script type="text/javascript" src="inc/jshead/boxmenu_toggle.js"></script> <script type="text/javascript" src="inc/jshead/fotorama.js"></script> <script type="text/javascript" src="inc/jshead/jquery.imagecube.min.js"></script> <script type="text/javascript" src="inc/jshead/sidephoto.js"></script> <script type="text/javascript" src="inc/jshead/slides.min.jquery.js"></script> <script type="text/javascript" src="inc/jshead/slidesjs.js"></script> </head><body> <table style="margin: auto; width: 100%; text-align: center;"> <tbody> <tr> <td style="width: 100%; vertical-align: top; text-align: left;"> <div class="tbl tblout" onmouseover="this.className = 'tbl tblover'" onmouseout="this.className = 'tbl tblout'"> <div style="padding: 6px;"> <h1>Comment attacher une image dans la fenêtre de géométrie de Casyopée</h1> <p>Il est possible d'attacher une image à un point ou à un segment.<br> Si le point est mobile, ou si le segment a des extrémités mobiles, l'image suivra ce ou ses points dans les déplacements.</p> <h2 style="background-color: white;">Attacher une image à un point</h2> <table style="width: 50%; text-align: left; margin-left: 0px; margin-right: auto;" border="1" cellpadding="1" cellspacing="1"> <tbody> <tr> <td>De façon à placer correctement l'image, il est utile de créer un point fixe (point repéré)</td> <td><img alt="" src="/help/imgFrHelp/InsereImage/Im1.png" style="width: 285px; height: 231px;"></td> </tr> <tr> <td> <p>
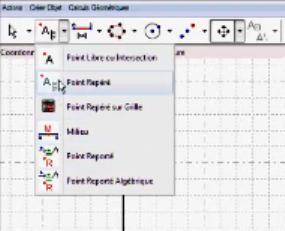
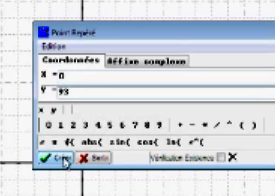
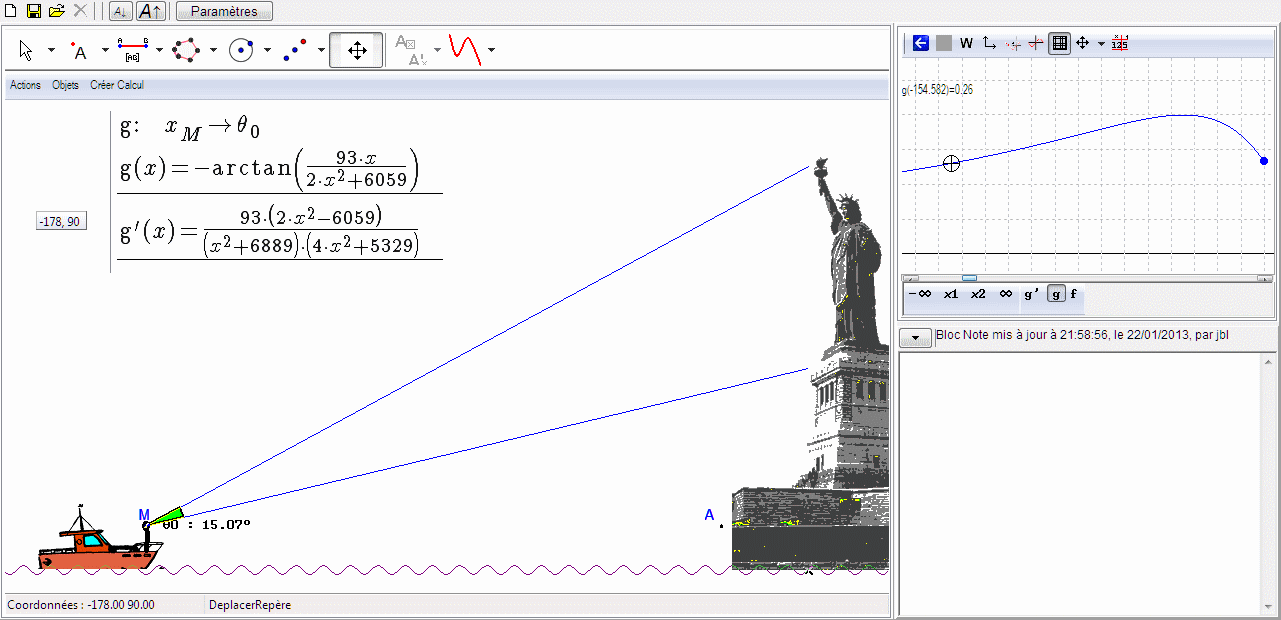
Ici, nous atttachons une image de la statue de la Liberté qui culmine à 93 mètres.</p> </td> <td><img alt="" src="/help/imgFrHelp/InsereImage/Im2.png"></td> </tr> <tr> <td>Nous utilisons l'outil Zoom Arrière</td> <td><img alt="" src="/help/imgFrHelp/InsereImage/Im3.png"></td> </tr> <tr> <td> <p>
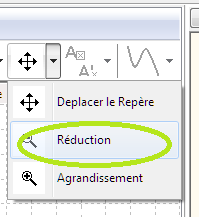
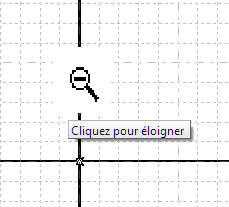
et nous l'activons jusqu'à faire apparaître l'origine et le point repéré.</p> <p>Nous aurions pu aussi utiliser la souris (Ctrl Scroll bas)</p> </td> <td><img alt="" src="/help/imgFrHelp/InsereImage/Im4.png"></td> </tr> <tr> <td> <p>
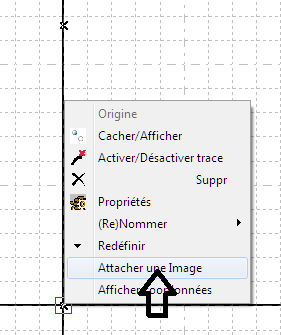
Nous choisissons d'attacher l'image à l'origine.</p> <p>Click droit sur ce point&nbsp;pour le menu contextuel. Choisir "attacher une image".</p> </td> <td><img alt="" src="/help/imgFrHelp/InsereImage/Im5.png"></td> </tr> <tr> <td>Une boîte de choix d'un fichier s'ouvre. Les fichiers de format graphique sont proposés.</td> <td><img alt="" src="/help/imgFrHelp/InsereImage/Im6.png" style="width: 400px; height: 383px;"></td> </tr> <tr> <td>L'image se place avec son coin bas gauche sur le point choisi.</td> <td><img alt="" src="/help/imgFrHelp/InsereImage/Im7.png" style="width: 433px; height: 354px;" height="471" width="563"></td> </tr> <tr> <td> <p>
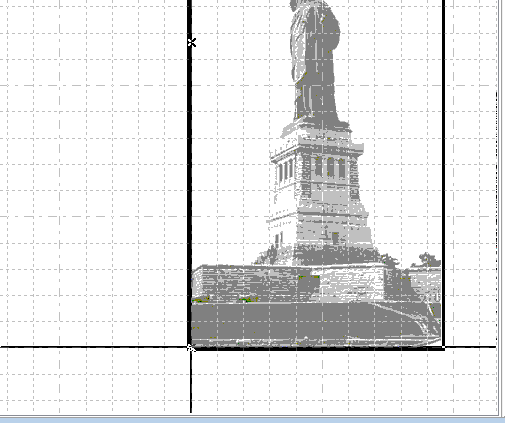
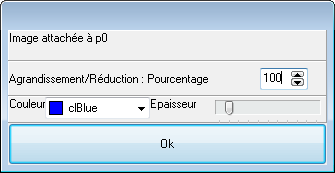
Un click droit sur l'image donne accès à ses propriétés.</p> <p>Il est possible de choisir un taux d'agrandissement pour bien cadrer l'image.</p> </td> <td><img alt="" src="/help/imgFrHelp/InsereImage/Im8.png"></td> </tr> <tr> <td>Voici l'image bien cadrée</td> <td><img alt="" src="/help/imgFrHelp/InsereImage/Im9.png"></td> </tr> <tr> <td>
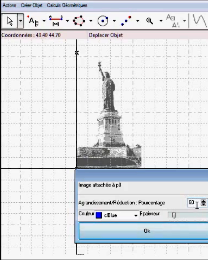
Il est possible aussi de faire tourner l'image.</td> <td><img alt="" src="/help/imgFrHelp/InsereImage/Im10.png" style="width: 332px; height: 198px;"></td> </tr> <tr> <td> <p>
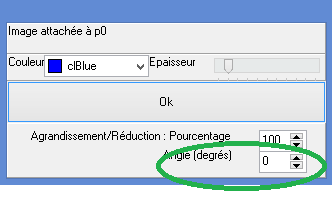
En attachant une image à un point libre sur segment ou cercle, et en donnant une vitesse à ce point, on crée une animation.</p> <p>Pour créer un gif animé, utiliser Fichier, enregistrer écran.</p> </td> <td><img alt="" src="/help/imgFrHelp/InsereImage/Screen0.gif" style="width: 450px; height: 218px;"><comment title="/td" xmlns="http://disruptive-innovations.com/zoo/nvu"></comment></td> </tr> </tbody> </table> <h2 style="background-color: white;">Attacher une image à un segment</h2> <table style="width: 50%; text-align: left; margin-left: 0px; margin-right: auto;" border="1" cellpadding="2" cellspacing="2"> <tbody> <tr> <td>Comme pour les points, une boîte de choix d'un fichier s'ouvre. Les fichiers de format graphique sont proposés.</td> <td><img alt="" src="/help/imgFrHelp/InsereImage/Im11.png" style="width: 295px; height: 199px;"></td> </tr> <tr> <td>
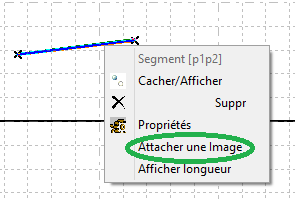
Les points en bas de l'image, à gauche et à doite, sont placés aux deux extrémités du segment.</td> <td><img alt="" src="/help/imgFrHelp/InsereImage/Im12.png" style="width: 154px; height: 273px;"></td> </tr> <tr> <td>
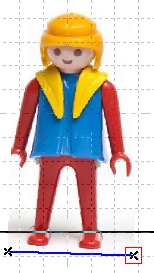
L'image suit le segment dans le déplacement d'une des extrémités.</td> <td><img alt="" src="/help/imgFrHelp/InsereImage/Im13.png" style="width: 187px; height: 255px;"></td> </tr> <tr> <td>
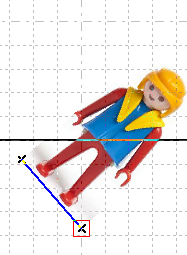
Comme pour les points,il est possible de redimensionner et de faire tourner l'image via le menu propriétés de l'image.
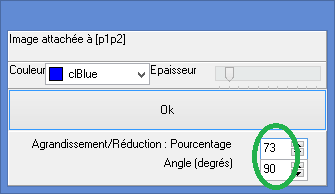
</td> <td><img alt="" src="/help/imgFrHelp/InsereImage/Im14.png" style="width: 332px; height: 198px;"></td> </tr> <tr> <td><br> </td> <td><img alt="" src="/help/imgFrHelp/InsereImage/Im15.png" style="width: 159px; height: 145px;"></td> </tr> </tbody> </table> <p>&nbsp; </p> </div> <hr style="margin-left: 0px; margin-right: auto;"> <div class="tbl tblout" onmouseover="this.className = 'tbl tblover'" onmouseout="this.className = 'tbl tblout'"> <table style="border: medium none ; margin: auto auto auto 0px; text-align: left;"> <tbody> <tr> <td> <br> </td> </tr> </tbody> </table> </div> <br> </div> <br> <br> <div id="UnderBoxes"> </div> </td> </tr> </tbody> </table> </body></html>